Import library modules
In this tutorial, you are going to write a simple dapp that enables you to store and look up telephone numbers. This tutorial illustrates how to import and use a few basic Motoko library functions.
For this tutorial, the Motoko base library functions are defined in the List and AssocList modules and enable you to work with lists as linked key-value pairs.
In this example, the key is a name and the value is the phone text string associated with that name.
This dapp supports the following function calls:
-
The
insertfunction accepts thenameandphonekey-value pair as input stored in thebookvariable. -
The
lookupfunction is a query that uses the specifiednamekey as input to find the associated phone number.
Before you begin
Before starting the tutorial, verify the following:
-
You have downloaded and installed the DFINITY Canister SDK package as described in Download and install.
-
You have stopped the local canister execution environment provided by
dfx.
This tutorial takes approximately 10 minutes to complete.
Create a new project
To create a new project for this tutorial:
-
Open a terminal shell on your local computer, if you don’t already have one open.
-
Change to the folder you are using for your Internet Computer projects, if you are using one.
-
Create a new project by running the following command:
dfx new phonebook -
Change to your project directory by running the following command:
cd phonebook
Modify the default dapp
For this tutorial, let’s create a new main.mo file for the simple phone number lookup dapp.
To modify the default template:
-
Open the
src/phonebook/main.mofile in a text editor and delete the existing content. -
Copy and paste the following sample code into the
main.mofile:// Import standard library functions for lists import L "mo:base/List"; import A "mo:base/AssocList"; // The PhoneBook actor. actor { // Type aliases make the rest of the code easier to read. public type Name = Text; public type Phone = Text; // The actor maps names to phone numbers. flexible var book: A.AssocList<Name, Phone> = L.nil<(Name, Phone)>(); // An auxiliary function checks whether two names are equal. func nameEq(l: Name, r: Name): Bool { return l == r; }; // A shared invokable function that inserts a new entry // into the phone book or replaces the previous one. public func insert(name: Name, phone: Phone): async () { let (newBook, _) = A.replace<Name, Phone>(book, name, nameEq, ?phone); book := newBook; }; // A shared read-only query function that returns the (optional) // phone number corresponding to the person with the given name. public query func lookup(name: Name): async ?Phone { return A.find<Name, Phone>(book, name, nameEq); }; };In looking at this sample dapp, you might notice the following key elements:
-
The code defines
NameandPhoneas custom Text types. Creating user-defined types improves the readability of the code. -
The
insertfunction is an update call and thelookupfunction is a query call. -
The
Phonetype is identified as an optional value by using the?Phonesyntax.
-
Start the local canister execution environment
For development purposes dfx provides a local canister execution environment. This requires a dfx.json file, so you should be sure you are in your project’s root directory. For this tutorial, you should have two separate terminal shells, so that you can start and see the output of the local canister execution environment in one terminal and manage your project in another.
To start the local canister execution environment:
-
Open a new terminal window or tab on your local computer.
-
Navigate to the root directory for your project, if necessary.
-
You should now have two terminals open.
-
You should have the project directory as your current working directory.
-
-
Start the local canister execution environment on your local computer by running the following command:
dfx start --cleanFor this tutorial, we’re using the
--cleanoption to start the local canister execution environment in a clean state.This option removes any orphan background processes or canister identifiers that might disrupt normal operations. For example, if you forgot to issue a
dfx stopwhen moving between projects, you might have a process running in the background or in another terminal. The--cleanoption ensures that you can start the local canister execution environment and continue to the next step without manually finding and terminating any running processes. -
Leave the terminal that displays the output of the local canister execution environment open and switch your focus to your original terminal where you created your new project.
Register, build, and deploy the dapp
Once the local canister execution environment is up and running in your development environment, you can register, build, and deploy your dapp onto it.
To deploy the dapp locally:
-
Check that you are still in the root directory for your project, if needed.
-
Register, build, and deploy your dapp locally by running the following command:
dfx deploy phonebookThe
dfx.jsonfile provides default settings for creating a dapp front-end entry point andassetscanister smart contract.In previous tutorials, we deleted the entries for the asset canister because we were not adding a front-end for the sample dapp. That change kept our project workspace tidy by eliminating files that would go unused. There is no requirement to do this, however, and there is no harm in leaving the asset canister smart contract description in the
dfx.jsonfile. For example, you might want to use it as a placeholder if you intend to add front-end assets later.For this tutorial, you can deploy just the phonebook back-end canister smart contract using the
dfx deploy phonebookcommand because the project doesn’t include any front-end assets and you will interact with it via the terminal.Although this tutorial illustrates how to skip compiling a front-end canister, you can add a simple user interface to this dapp later by exploring the phone-book project in the examples repository.
Add names and numbers using the insert function
You now have a dapp deployed as a canister smart contract on your local canister execution environment and can test your dapp by using dfx canister call commands.
To test the dapp you have deployed:
-
Use the
dfx canister callcommand to call the canister smart contractphonebookusing theinsertfunction and pass it a name and phone number by running the following command:dfx canister call phonebook insert '("Chris Lynn", "01 415 792 1333")' -
Add a second name and number pair by running the following command:
dfx canister call phonebook insert '("Maya Garcia", "01 408 395 7276")' -
Verify that the command returns the number associated with "Chris Lynn" using the
lookupfunction by running the following command:dfx canister call phonebook lookup '("Chris Lynn")'The command returns output similar to the following:
(opt "01 415 792 1333")
-
Try to call the
lookupfunction with the number associated with "Maya Garcia" by running the following command:dfx canister call phonebook lookup '("01 408 395 7276")'Note that, in this case, the command returns
(null)because the phone number is not a key associated with the "Maya Garcia" name entry. -
Try to call the
lookupfunction again to return the phone numbers for both "Maya Garcia" and "Chris Lynn" by running the following command:dfx canister call phonebook lookup '("Maya Garcia","Chris Lynn")'Because the dapp is written to return one value for one key, the command only returns information associated with the first key, in this example the phone number for
Maya Garcia.
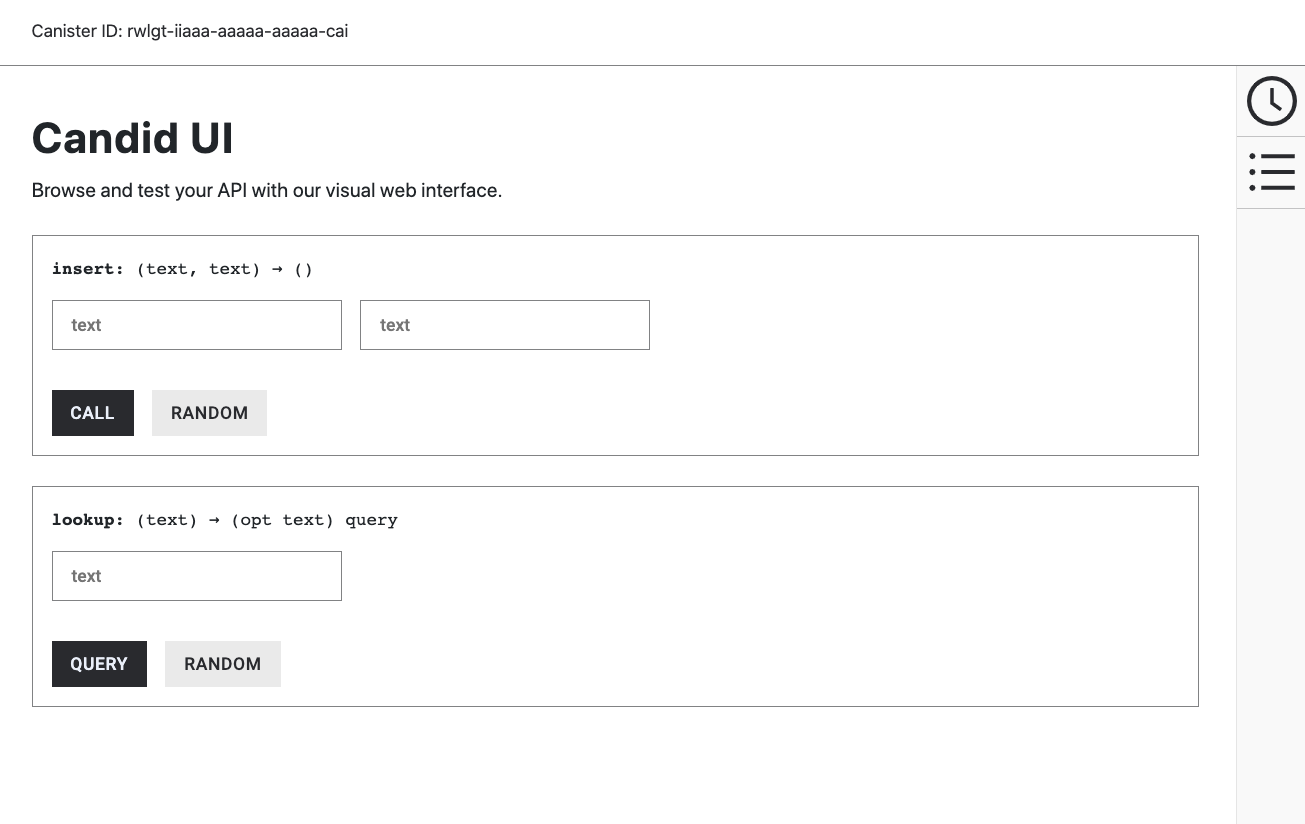
ブラウザー上での関数のテスト
キャニスター・インターフェース記述言語(Candid または IDL と呼ばれることが多い)は、canister スマートコントラクトの署名を指定するための共通言語を提供します。Candid は、異なる言語で書かれていたり、異なるツールでアクセスされる canister スマートコントラクトを扱うための統一された方法を提供します。 例えば、Candid は、基礎となるプログラムが Rust、JavaScript、Motoko のいずれであっても、一貫した表示となります。また、Candid は、dfx コマンドラインインターフェイスや Network Nervous System Dapp などの異なるツールが、サービスに対する共通の記述を共有できるようにします。
Actor の型注釈に基づいて、Candid はテストやデバッグのために canister の関数を呼び出すことができる Web インターフェースも提供しています。
dfx deploy または dfx canister install コマンドを使用してプロジェクトをローカルの canister 実行環境にデプロイした後、ブラウザで Candid インターフェイスのエンドポイントにアクセスできます。
この Web インターフェイス(Candid UI)は、サービスの説明を決められた形式で表現しており、フロントエンドのコードを書くことなく、関数をすばやく表示してテストしたり、さまざまなデータタイプを入力して実験したりすることができます。
Candid の Web インターフェースを使って canister の関数をテストするには、以下のようにします:
-
現在のプロジェクトに関連する Candid UI の canister の識別子を、
dfx canister id __Candid_UIコマンドを使って見つけます。dfx canister id __Candid_UIこのコマンドは、Candid UIの canister 識別子を以下のような出力で表示します。
r7inp-6aaaa-aaaaa-aaabq-cai
-
Candid UI の canister 識別子をクリップボードで使用できるようにコピーします。
-
ローカルの canister 実行環境を停止した場合は、以下のコマンドを実行してローカルで再起動します。
dfx start --background -
ブラウザを開き、設定ファイルである
dfx.jsonで指定されたアドレスとポート番号に移動します。デフォルトでは、ローカルの canister 実行環境は、
127.0.0.1:8000のアドレスとポート番号にバインドされます。 -
必要な
canisterIdパラメータと、dfx canister id __Candid_UIコマンドで返される Candid UI の canister 識別子を URL に追加します。例えば、完全な URL は以下のようになりますが、
CANDID-UI-CANISTER-IDENTIFIERはdfx canister id __Candid_UIコマンドで返された値になります。http://127.0.0.1:8000/?canisterId=<CANDID-UI-CANISTER-IDENTIFIER>
例えば、上記の Candid UI の canister 識別子の例では、以下のようになります。
http://127.0.0.1:8000/?canisterId=r7inp-6aaaa-aaaaa-aaabq-cai
ブラウザには、canister の識別子を指定するか、Candid の説明(
.did)ファイルを選択するためのフォームが表示されます。 このフィールドは、対話したい canister の識別子を参照することに注意してください(最後のステップで使用した Candid UI の canister 識別子とは異なります)。 -
テストしたい canister の識別子を「 Provide a canister ID 」フィールドに指定し、「 Go 」をクリックしてサービスの説明を表示します。
使用する canister の識別子がわからない場合は、
dfx canister idコマンドを実行して、特定の canister 名の識別子を調べることができます。 例えば、my_counterという名前の canister の識別子を得るには、次のようにします:dfx canister id my_counter
-
Dappで定義されている関数の呼び出しと型のリストを確認します。
-
関数に合った型の値を入力するか、「 Random 」をクリックして値を生成し、「 Call 」または「 Query 」をクリックして結果を確認します。
なお、データ型によっては、Candid インターフェースに、関数をテストするための追加の設定が表示される場合があります。 例えば、関数が配列を取る場合は、値を入力する前に配列のアイテム数を指定する必要があるかもしれません。
+
Revise the source code in your dapp
To extend what you have learned in this tutorial, you might want to try modifying the source code to return different results.
For example, you might want to change the source code so that instead of a dapp that inserts and looks up a current key-value (name-phone) pair to create a dapp that stores contact information similar to a database "record" in which a primary key is associated with multiple fields. In this example, your dapp might enable users or another dapp to add information—such as a home phone number, a cell phone number, an email address, and a street address—and selectively return all or specific field values.
Stop the local canister execution environment
After you finish experimenting with your dapp, you can stop the local canister execution environment so that it does not continue running in the background.
To stop the local canister execution environment:
-
In the terminal that displays network operations, press Control-C to interrupt the local network process.
-
Stop the local canister execution environment by running the following command:
dfx stop